> ## Documentation Index
> Fetch the complete documentation index at: https://docs.civic.com/llms.txt
> Use this file to discover all available pages before exploring further.
# App Integration
> How to integrate your app with Civic — using Civic Auth directly or via token exchange with a third-party provider
This guide is for **app builders** who want to connect their own application to Civic — where your app has its own users and you need each user to get their own Civic access. If you just need a token to plug into a third-party agent platform (like OpenAI Agent Builder or n8n), see [Civic Tokens](/civic/concepts/tokens) instead.
Civic exposes its capabilities through a single MCP endpoint at `https://app.civic.com/hub/mcp`. Every request to this endpoint must carry a valid access token issued by **Civic Auth** (`auth.civic.com`).
## How access tokens work
Access tokens are JWTs issued by Civic Auth. Each token is scoped to a specific **application** (identified by a `CLIENT_ID`), which determines what a user is allowed to do — which tools they can call, which third-party services they can connect, and what data they can access.
## Setting up your integration
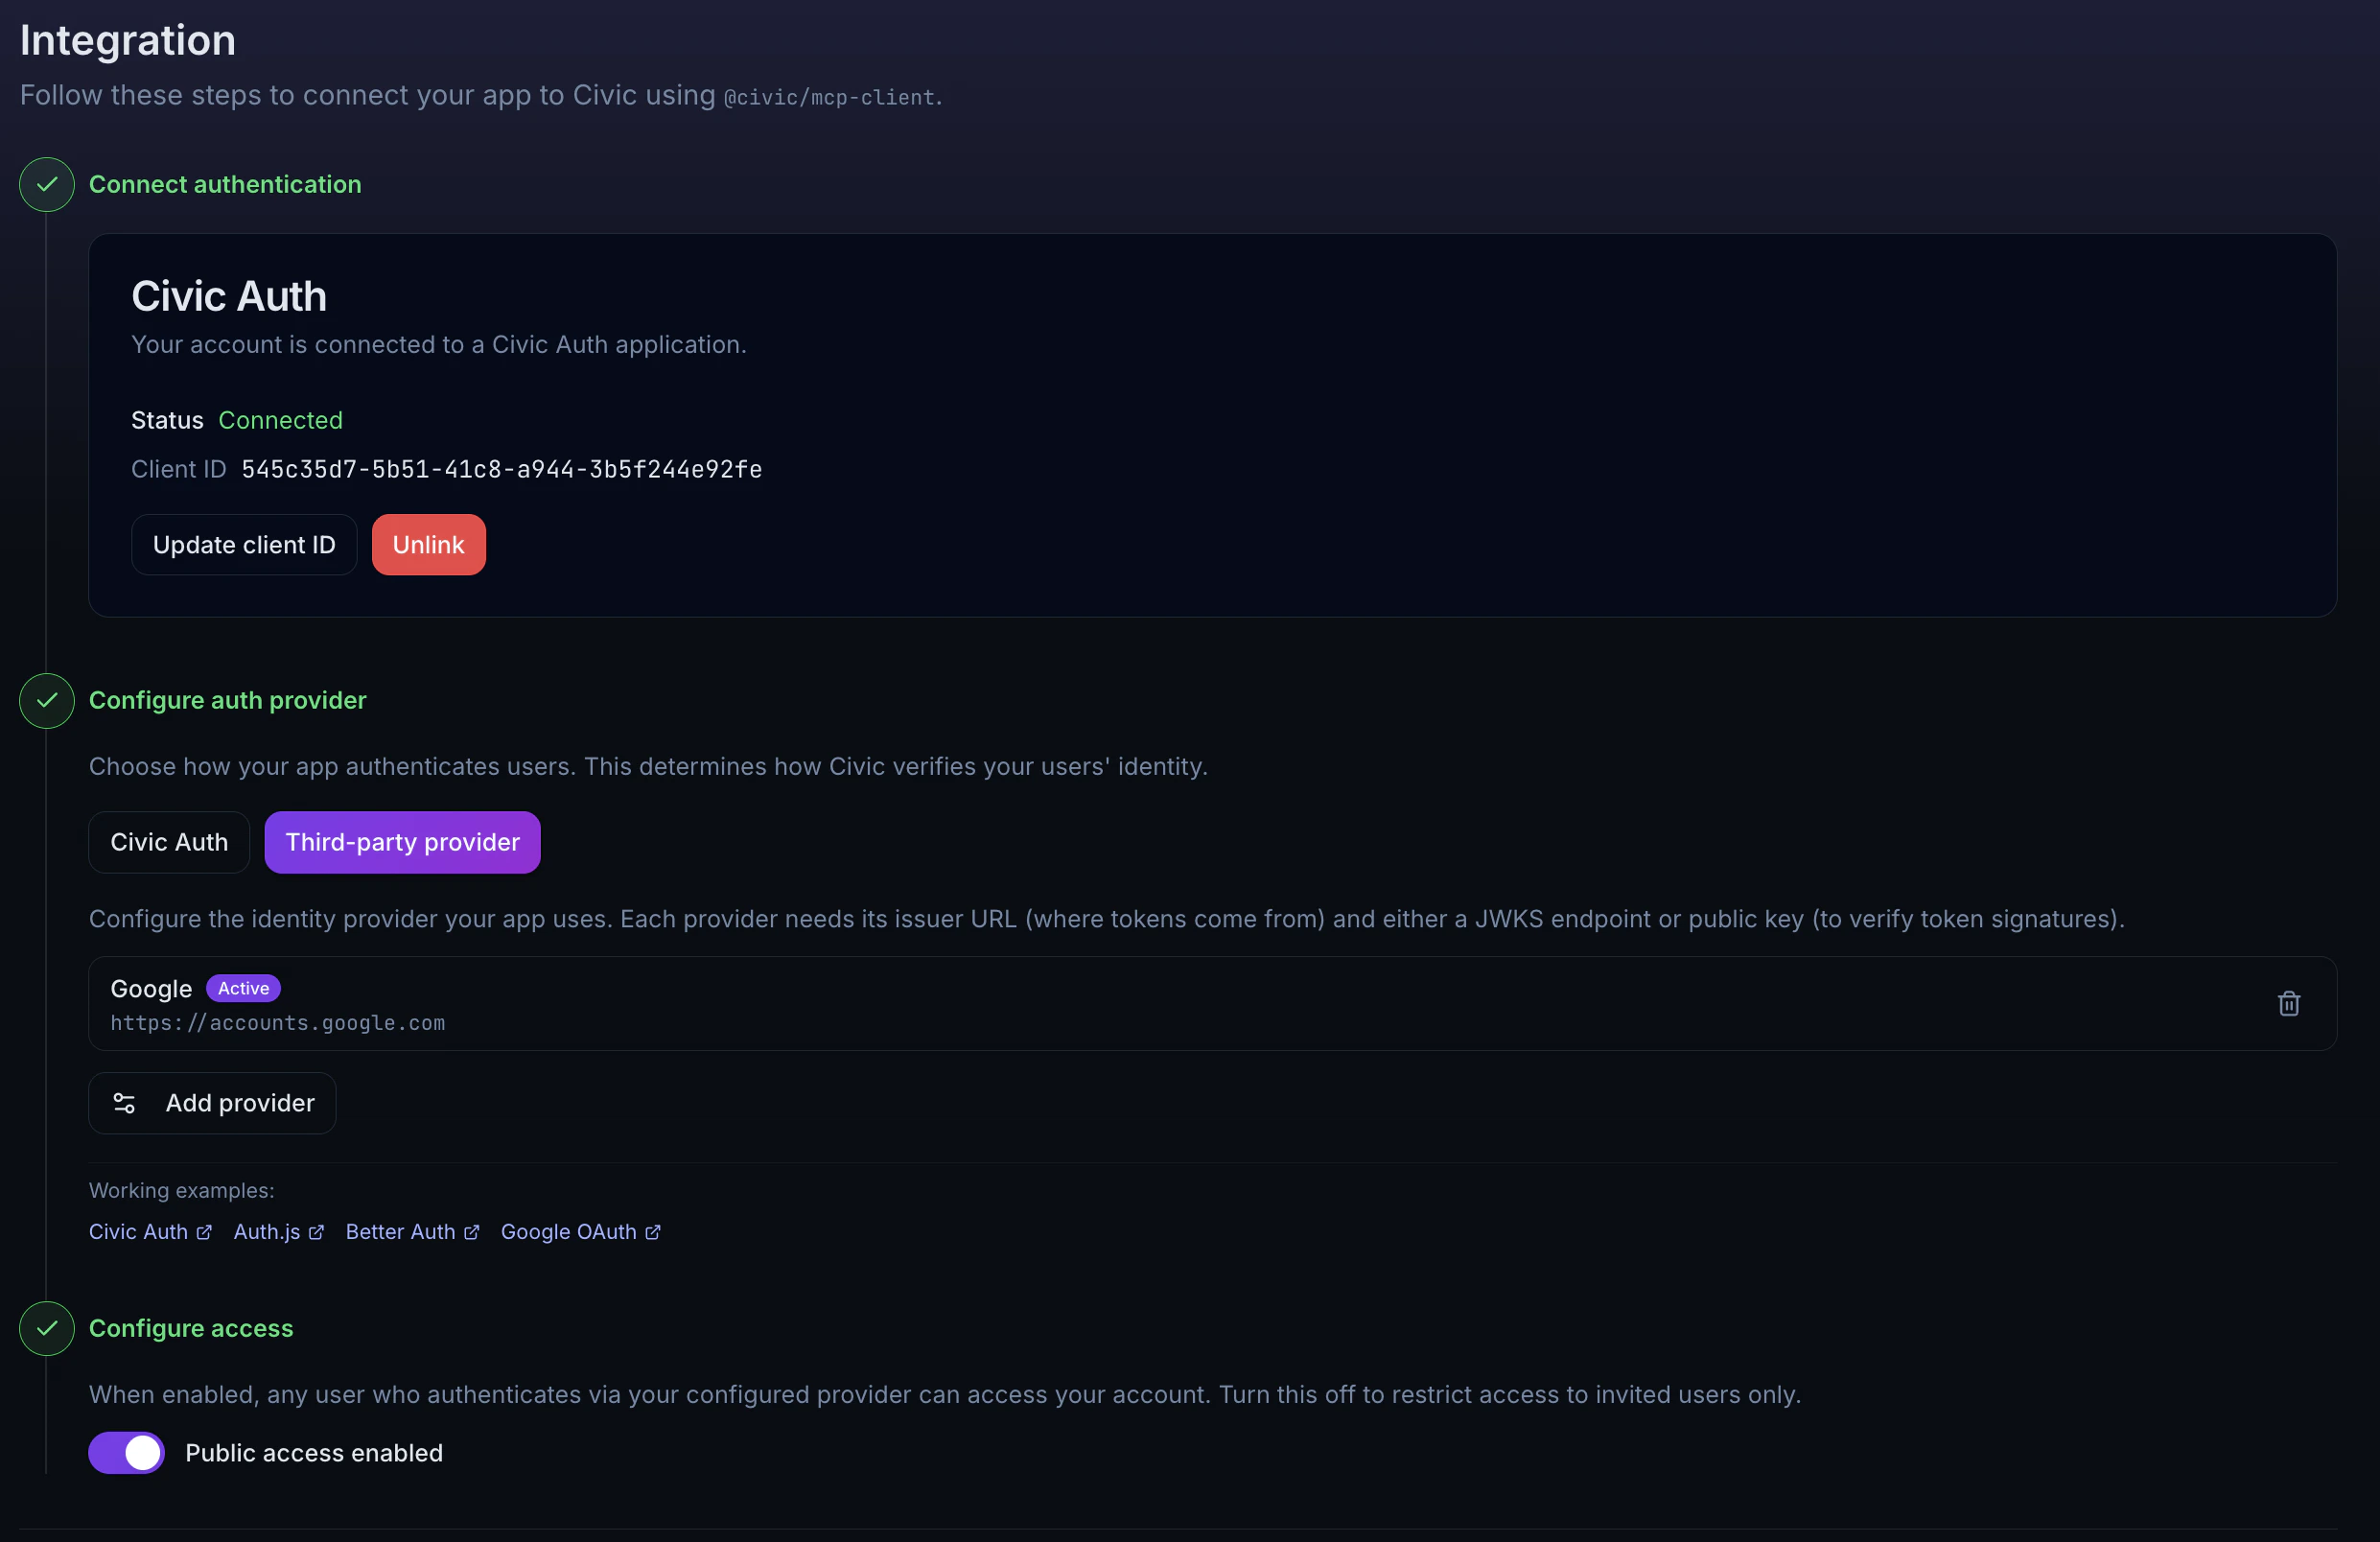
The **[Settings → Integration](https://app.civic.com/web/settings/integration)** page in your Civic account provides a guided setup that walks you through connecting your app to Civic. The setup has three steps:
 ### Step 1: Connect authentication
Create or link a Civic Auth application to your account. You have two options:
* **Create new auth connection** — Civic automatically creates a Civic Auth application, securely stores the credentials, links the Client ID to your account, and enables public access. This is the fastest way to get started.
* **Link existing** — If you already have a Civic Auth application registered at [auth.civic.com](https://auth.civic.com), enter your Client ID and Client Secret to link it. The secret is stored encrypted and used to manage token exchange configuration on your behalf.
Once connected, the [Integration page](https://app.civic.com/web/settings/integration) displays your credentials (`CIVIC_CLIENT_ID` and, for the token exchange path, `CIVIC_CLIENT_SECRET`) as environment variables ready to copy into your app's `.env` file.
### Step 2: Configure your auth provider
Choose how your application authenticates users. This determines how Civic verifies your users' identity.
**Best for:** Applications that don't have an existing identity provider, or that want the simplest integration path.
With Civic Auth, your users' tokens work directly with Civic — no token exchange setup is needed. Use [`@civic/auth`](https://www.npmjs.com/package/@civic/auth) in your app and the user's session token is automatically valid for Civic API calls.
No additional configuration is required for this path.
See the [Civic Auth demo](https://github.com/civicteam/demos/tree/main/apps/civic-auth-demo) for a complete working example.
**Best for:** Applications that already have their own authentication system.
Choose this path if your app uses any of the following:
* **[Auth.js](https://authjs.dev/)** (NextAuth) — any Auth.js provider (Google, GitHub, email, etc.)
* **[Better Auth](https://www.better-auth.com/)** — any Better Auth provider
* **Google OAuth** directly
* **Auth0**, **Azure AD / Entra ID**, **Okta**, or any other OIDC-compliant identity provider
Configure the identity provider your app uses directly from the [Integration page](https://app.civic.com/web/settings/integration). Each provider needs:
* **Issuer URL** — Where tokens come from (e.g. `https://accounts.google.com`)
* **JWKS endpoint or public key** — To verify token signatures
The [Integration page](https://app.civic.com/web/settings/integration) provides presets for common providers (Google, Auth0) or you can configure a custom provider. This configures the [Token Exchange](/overview/token-exchange) flow so that tokens from your identity provider can be exchanged for Civic access tokens.
Provider configuration is managed through the Civic UI — you do not need to configure token exchange separately at auth.civic.com.
Working examples:
* [Auth.js (NextAuth)](https://github.com/civicteam/demos/tree/main/apps/next-auth-demo) — federated token exchange with Auth.js providers
* [Better Auth](https://github.com/civicteam/demos/tree/main/apps/better-auth-demo) — federated token exchange with Better Auth
* [Google OAuth](https://github.com/civicteam/demos/tree/main/apps/google-auth-demo) — direct Google OAuth integration
### Step 3: Configure access
Control whether new users can join your account automatically:
* **Public access enabled** — Any user who authenticates via your configured provider can access your account with an `END_USER` role.
* **Public access disabled** (default) — Only invited users can access the account. Their access token must have both a matching email and Client ID.
## Connecting to Civic
Once setup is complete, your app needs to obtain a Civic access token **for each user** and use it to connect to the MCP endpoint. There are two ways to do this.
### Using `@civic/mcp-client` (recommended)
The [`@civic/mcp-client`](https://www.npmjs.com/package/@civic/mcp-client) SDK handles authentication and token exchange for you — each user gets their own scoped connection. The code differs slightly depending on your auth provider.
```typescript theme={null}
import { getTokens } from "@civic/auth/nextjs";
const tokens = await getTokens();
const client = new CivicMcpClient({
auth: { token: tokens.accessToken },
});
```
```typescript theme={null}
const client = new CivicMcpClient({
auth: {
tokenExchange: {
clientId: process.env.CIVIC_CLIENT_ID,
clientSecret: process.env.CIVIC_CLIENT_SECRET,
subjectToken: () => getSessionToken(), // from your auth provider
},
},
civicProfile: process.env.CIVIC_PROFILE_ID, // optional: lock the client to this profile
});
```
The `subjectToken` function should return a JWT from your identity provider (e.g. the session token from Auth.js, Better Auth, or a Google ID token). The SDK handles the token exchange automatically.
Then use the client with your AI SDK:
```typescript theme={null}
const tools = await client.getTools(vercelAIAdapter());
const result = streamText({
model,
messages,
tools,
});
```
Direct Civic Auth integration — simplest path
Federated token exchange with Auth.js (NextAuth)
Federated token exchange with Better Auth
Direct Google OAuth token exchange
### Direct API access
If you are not using `@civic/mcp-client` (e.g. from a non-JavaScript stack or a custom MCP client), your backend needs to obtain a Civic access token for each user and pass it when calling the hub.
This is different from [Civic Tokens](/civic/concepts/tokens), which are single-user tokens generated manually from the Install page for use with agent platforms. The flow described here is programmatic and per-user — your app exchanges each user's identity token for a Civic access token at runtime.
**If using Civic Auth:** The access token from your Civic Auth session is already valid — pass it directly.
**If using a third-party provider:** Your backend exchanges each user's identity token for a Civic access token via the [Token Exchange](/overview/token-exchange) endpoint (`POST https://auth.civic.com/oauth/token`). See the [Token Exchange](/overview/token-exchange) guide for the full protocol details, including request parameters, provider configuration examples, and code samples.
Once you have a Civic access token, pass it in the `Authorization` header:
```
POST https://app.civic.com/hub/mcp
Content-Type: application/json
Authorization: Bearer
```
If your account has multiple profiles configured, include the `x-civic-profile-id` header to scope requests to a specific profile:
```
x-civic-profile-id:
```
#### Scoping access via token exchange
The token exchange grant supports an optional parameter to narrow the scope of the resulting access token:
`civic_profile`: Profile ID (UUID) to include as a claim in the exchanged token.
Since a linked Civic Auth application is already scoped to the account by default (via the Client ID), these parameters are primarily useful for restricting access to a **specific profile or toolkit** within the account — for example, limiting a user or agent to a single toolkit rather than the entire organization.
**Credential locking:** When `civic_profile` is present in the exchanged token, the profile is automatically **locked**. A locked profile can only access credentials that have been explicitly [assigned to it](/civic/reference/authorizations#profile-assignment) — unassigned credentials are not resolved. New credentials authenticated through the scoped token are automatically assigned to the profile. If you are migrating to profile-scoped tokens, review your credential assignments to ensure existing credentials are assigned to the relevant profiles.
### Step 1: Connect authentication
Create or link a Civic Auth application to your account. You have two options:
* **Create new auth connection** — Civic automatically creates a Civic Auth application, securely stores the credentials, links the Client ID to your account, and enables public access. This is the fastest way to get started.
* **Link existing** — If you already have a Civic Auth application registered at [auth.civic.com](https://auth.civic.com), enter your Client ID and Client Secret to link it. The secret is stored encrypted and used to manage token exchange configuration on your behalf.
Once connected, the [Integration page](https://app.civic.com/web/settings/integration) displays your credentials (`CIVIC_CLIENT_ID` and, for the token exchange path, `CIVIC_CLIENT_SECRET`) as environment variables ready to copy into your app's `.env` file.
### Step 2: Configure your auth provider
Choose how your application authenticates users. This determines how Civic verifies your users' identity.
**Best for:** Applications that don't have an existing identity provider, or that want the simplest integration path.
With Civic Auth, your users' tokens work directly with Civic — no token exchange setup is needed. Use [`@civic/auth`](https://www.npmjs.com/package/@civic/auth) in your app and the user's session token is automatically valid for Civic API calls.
No additional configuration is required for this path.
See the [Civic Auth demo](https://github.com/civicteam/demos/tree/main/apps/civic-auth-demo) for a complete working example.
**Best for:** Applications that already have their own authentication system.
Choose this path if your app uses any of the following:
* **[Auth.js](https://authjs.dev/)** (NextAuth) — any Auth.js provider (Google, GitHub, email, etc.)
* **[Better Auth](https://www.better-auth.com/)** — any Better Auth provider
* **Google OAuth** directly
* **Auth0**, **Azure AD / Entra ID**, **Okta**, or any other OIDC-compliant identity provider
Configure the identity provider your app uses directly from the [Integration page](https://app.civic.com/web/settings/integration). Each provider needs:
* **Issuer URL** — Where tokens come from (e.g. `https://accounts.google.com`)
* **JWKS endpoint or public key** — To verify token signatures
The [Integration page](https://app.civic.com/web/settings/integration) provides presets for common providers (Google, Auth0) or you can configure a custom provider. This configures the [Token Exchange](/overview/token-exchange) flow so that tokens from your identity provider can be exchanged for Civic access tokens.
Provider configuration is managed through the Civic UI — you do not need to configure token exchange separately at auth.civic.com.
Working examples:
* [Auth.js (NextAuth)](https://github.com/civicteam/demos/tree/main/apps/next-auth-demo) — federated token exchange with Auth.js providers
* [Better Auth](https://github.com/civicteam/demos/tree/main/apps/better-auth-demo) — federated token exchange with Better Auth
* [Google OAuth](https://github.com/civicteam/demos/tree/main/apps/google-auth-demo) — direct Google OAuth integration
### Step 3: Configure access
Control whether new users can join your account automatically:
* **Public access enabled** — Any user who authenticates via your configured provider can access your account with an `END_USER` role.
* **Public access disabled** (default) — Only invited users can access the account. Their access token must have both a matching email and Client ID.
## Connecting to Civic
Once setup is complete, your app needs to obtain a Civic access token **for each user** and use it to connect to the MCP endpoint. There are two ways to do this.
### Using `@civic/mcp-client` (recommended)
The [`@civic/mcp-client`](https://www.npmjs.com/package/@civic/mcp-client) SDK handles authentication and token exchange for you — each user gets their own scoped connection. The code differs slightly depending on your auth provider.
```typescript theme={null}
import { getTokens } from "@civic/auth/nextjs";
const tokens = await getTokens();
const client = new CivicMcpClient({
auth: { token: tokens.accessToken },
});
```
```typescript theme={null}
const client = new CivicMcpClient({
auth: {
tokenExchange: {
clientId: process.env.CIVIC_CLIENT_ID,
clientSecret: process.env.CIVIC_CLIENT_SECRET,
subjectToken: () => getSessionToken(), // from your auth provider
},
},
civicProfile: process.env.CIVIC_PROFILE_ID, // optional: lock the client to this profile
});
```
The `subjectToken` function should return a JWT from your identity provider (e.g. the session token from Auth.js, Better Auth, or a Google ID token). The SDK handles the token exchange automatically.
Then use the client with your AI SDK:
```typescript theme={null}
const tools = await client.getTools(vercelAIAdapter());
const result = streamText({
model,
messages,
tools,
});
```
Direct Civic Auth integration — simplest path
Federated token exchange with Auth.js (NextAuth)
Federated token exchange with Better Auth
Direct Google OAuth token exchange
### Direct API access
If you are not using `@civic/mcp-client` (e.g. from a non-JavaScript stack or a custom MCP client), your backend needs to obtain a Civic access token for each user and pass it when calling the hub.
This is different from [Civic Tokens](/civic/concepts/tokens), which are single-user tokens generated manually from the Install page for use with agent platforms. The flow described here is programmatic and per-user — your app exchanges each user's identity token for a Civic access token at runtime.
**If using Civic Auth:** The access token from your Civic Auth session is already valid — pass it directly.
**If using a third-party provider:** Your backend exchanges each user's identity token for a Civic access token via the [Token Exchange](/overview/token-exchange) endpoint (`POST https://auth.civic.com/oauth/token`). See the [Token Exchange](/overview/token-exchange) guide for the full protocol details, including request parameters, provider configuration examples, and code samples.
Once you have a Civic access token, pass it in the `Authorization` header:
```
POST https://app.civic.com/hub/mcp
Content-Type: application/json
Authorization: Bearer
```
If your account has multiple profiles configured, include the `x-civic-profile-id` header to scope requests to a specific profile:
```
x-civic-profile-id:
```
#### Scoping access via token exchange
The token exchange grant supports an optional parameter to narrow the scope of the resulting access token:
`civic_profile`: Profile ID (UUID) to include as a claim in the exchanged token.
Since a linked Civic Auth application is already scoped to the account by default (via the Client ID), these parameters are primarily useful for restricting access to a **specific profile or toolkit** within the account — for example, limiting a user or agent to a single toolkit rather than the entire organization.
**Credential locking:** When `civic_profile` is present in the exchanged token, the profile is automatically **locked**. A locked profile can only access credentials that have been explicitly [assigned to it](/civic/reference/authorizations#profile-assignment) — unassigned credentials are not resolved. New credentials authenticated through the scoped token are automatically assigned to the profile. If you are migrating to profile-scoped tokens, review your credential assignments to ensure existing credentials are assigned to the relevant profiles.